In this section of the website, we would like for homeschooling families to send in suggestions for fun and educational projects for homeschoolers to add to their curriculum.
If you have done a really cool project in your homeschool that you would like to share, please send us a story about it, along with a few pictures.
Or, if you have a great idea for a project, but you haven't actually done it yet, if you don't mind sharing, send it to us, so we can post if for other homeschooling families to try.
No one ever wants to go first. So, we'll go first.
School Scrapbooking
When our girls were in elementary school, we came up with the idea to have them do a scrapbook for the school year. Our umbrella has a meeting at the end of the year in which students can display their work. It is something the children look forward to each year. But we were running into a problem. What should we share?
There are always the students with the great handwriting that display a hundred-page report, complete with drawn and colored pictures. And, then there are the scientific excellers that constructed a room-size villiage with working parts. And, let's not leave out those life-size charts, detailing huge amounts of facts, or the lego construction projects that would put the best engineer to shame. It is pretty impressive.
But, it left quite the quandary as to what we would display. Having a child that has ADHD, our students do a great deal of hands-on activities to help them master their classes. Instead of 100 page reports, we often have plays or readings, to allow them to "act out" the information. Instead of learning an instrument, we taught audio. Instead of constructing little villiage models, we constructed real, outdoor landscapes. And, the list goes on. So, when it came time for a display, we concluded that bringing the childrens' flower gardens to the meeting was simply not an option. And, although they had lots of paperwork they could show, after looking around at all the other students' projects, they wanted something a little more "flashy".
Out of that was born the "Scrapbooking Project". The idea was that we would capture all those projects and activities that we did throughout the year in pictures, so others could see all the work that they had done, of which they were very proud, but couldn't bring along to show.
What We Did
Throughout the year, we took pictures of each project they wanted to display, and toward the end of the year, we went to the Walmart and had pictures printed of all those activities. Then, for the next month's worth of Art classes, I had them assemble the pictures into a scrapbook and add hand-written information about each photo, and what they learned from the specific project.
I encouraged them to be as creative as they liked, drawing pictures, writing poems, and writing little stories, that we also included in the scrapbook.
By doing this, we captured visuals of physical activity, audio, hands-on science experiments, gardening, plays, field trips, and the many, many other elements of homeschool that just aren't on paper. By the time each girl was finished, their scrapbooks were full.
The girls loved the project, so we decided to do it every year, making a record of the school year through scrapbooking. Sometimes I'll see them sitting in the recliner looking at old scrapbooks from years back and giggling together about different projects they did.
The Result
Though the girls still love to display their scrapbooks and talk about all their non-written projects, probably the biggest asset of the project is that the girls will have something they can keep and show their grand-children someday. Picture one of them getting out a scrapbook in 50 years, and saying, "Look, back when I was in homeschool, do you know what I did?"
This year, because of Covid, instead of printing pictures at the Walmart, I opted to pull my digital pictures off the I phone, and place them on Word pages. I used the "insert text box" (insert, text box, draw text box, then you draw it on the page) feature on Word to place a text box, and then, I inserted the picture (insert, pictures, this divice, search for picture, insert). My reason for doing it this way is that I can, then, move the photos around on the Word page easily. I placed several pictures on a page, leaving a lot of blank space around them. Then, I printed them out, and the girls wrote in whatever they want to about the picture. Afterward, we laminated them. But, you could also slip them in one of those clear, plastic, cover sleeves. We got an early start this year, taking a few art classes here and there to complete pages as we go, instead of doing them all at the end.
The girls look forward to all the photo opts with each project these days. And, they get pretty creative. Once they had me take rapid-succession photos of them doing gymnastics in gym class, and show the pictures side by side to give an action feel. The "sky is the limit" on creativity that you can do with this project.
For a more tech option, the project could be a Powerpoint, instead of a scrapbook. It may be something where the student could learn technology skills with Powerpoint at the same time.
Let us know about some of your projects.
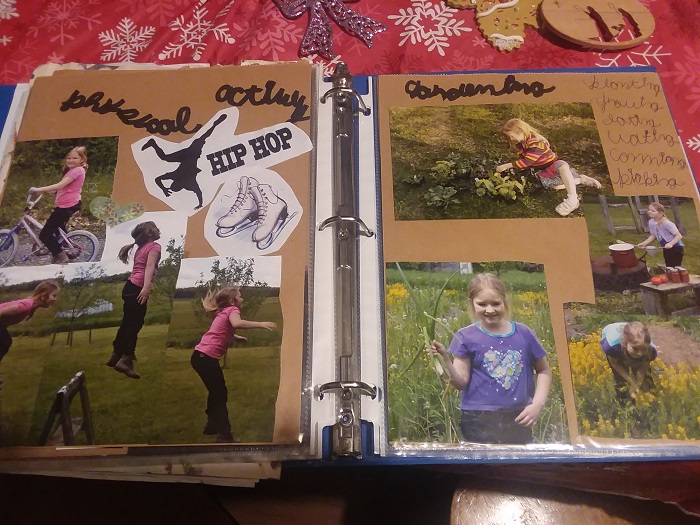 For the scrapbook cover, we used a 3-ring-binder, with a clear plastic cover (one of those that you can slide a page into), so we could also make a page to become the front cover. We used "brown paper bag" craft paper/scrapbook paper, which you can buy at the Walmart in a paper pad, and clear, plastic, page sleeves, found at Walmart in the school supply section.